
Displaying Numbers (and some letters)
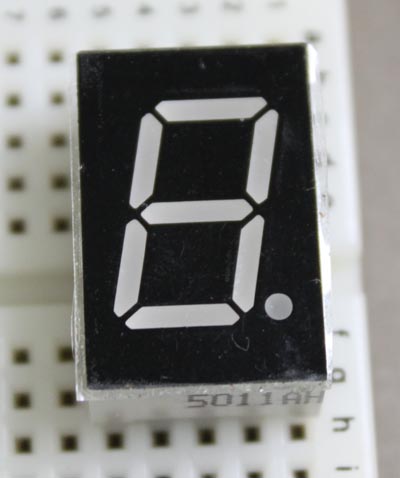
One very common output device is a set of LEDs arranged as seven bars that make up the shape of the number 8. Often there will be a small extra led at the lower right that can be used as a decimal point. Because there are 8 LEDs, this is often called and eight-segment display. There are two ways of packaging these sets of LEDs:
- All the positive ends are connected together in a "common anode" package;
- All the negative ends are connected together in a "common cathode" package.
Connecting the electronics
- Your eight-segment display should already be plugged into your breadboard with the top set of pins on one side of the trough and the bottom set of pins on the other side of the trough so that they will not be electrically connected to each other.
- Connect the middle pin on the bottom to the middle pin on the top with a wire, then connect a 330 ohm resistor. Connect the other side of the resistor to a Ground socket on the Arduino. This is the common cathode, and we are making sure that all the LEDs must route the current through this 330 ohm resistor before it completes the circuit to the ground.

- Now use separate wires to connect each of the other pins on the eight segment display to digital pins 2 to 9 on the Arduino. Use longer wires for the connections that are farther away from the Arduino, and bend the wires so you can easily see the surface of the display.

Testing the pin connections
Now you need to write a sketch for the Arduino that will turn on each of the LEDs in a controlled manner so that you can figure out which is which.- Start your sketch in the setup function by making pins 2 to 9 output pins. You will need eight lines like this (but keep changing the pin number):
pinMode(2, OUTPUT); - In the loop function, you will need to write a HIGH to each pin to turn it on, and then wirte a LOW to that pin to turn it off, with a delay in between so you have time to see it. The commands look like this for pin 2:
digitalWrite(2, HIGH);
delay(2000); //delays for 2 seconds
digitalWrite(2, LOW); - Save and upload your sketch so that you can test your display and find out which pin is controlling which segment on your display. This won't necessarily be the same as someone else's circuit - it all depends on how you connected the wires.
- Draw a diagram of which pin number is controlling which segment on your display. You can press the reset button on your Arduino to restart the sketch from the beginning.
- Create variables so that you can keep track of which pin number is connected to which segment of the display. For example:
int topLeft = 3;
Showing some numbers
Next, you will need to write a more complicated sketch that can make the standard shapes for the digits 0 to 9. Each of these digits needs several of the LED segments to be turned on and the rest to be turned off.
- Start by writing a plan on a piece of paper: which LEDs need to be on and off to make each of the ten digits 0 to 9? (Enrichment: can you make some letters, too?)
- Now create a new sketch. It can start with the same setup as the first sketch, but then you should write your own functions that will display the correct combinations of the segments for each number (or letter). To create your own function:
- Scroll down to the end of the sketch, after the curly bracket that ends the loop function.
- Type the special word "void", then the name of your function, then a pair of round brackets, then an opening curly bracket, like this:
void showOne() { - One each new line, enter a digitalWrite command to turn on or turn off a segment of the display. For example:
digitalWrite(topRight, HIGH); - You will need seven lines of code like this to control all seven segments. The decimal point will not be used.
- Remember to end your new function with the closing curly bracket.
showOne();
the two right-side segments should be turned on and all the rest should be turned off.
